
Friday, 31 August 2012
News Flash: Illamasqua is now more fairly priced.
I was very pleased to check the Myer website today to find that Illamasqua nail polish is now $21 a bottle rather than $34. It is still a little out of my everyday reach but at least it is more reasonable for a high end product. As an added bonus, Myer also has a free shipping promotion on most of their items at the moment. Good news I think. Here is the post that alerted me to the good news.

Awesome Aussie August: Farewell Winter - Ozotic 509
Today is officially the last day of Winter here in the Southern Hemisphere. How I wish that this means that the first of September would be magically warm to usher in Spring. It will most likely continue being chilly on and off for a while yet.
For my base I used three coats of Ozotic 509. Of course the sun hid for the day since I used a holographic polish. I had to resort to taking my pictures in the house.
So I took a picture in the kitchen with the flash...

In the bathroom directly under the heat light.

I had always planned on using Ozotic 509 for the base of a Winter manicure. Originally I was going to stamp with my spectraflaired blue holographic franken. I decided against it because I thought that might be too holographic. Is there any such thing? Konad Dark Blue was used to provide a contrast between the holographic awesomeness and the stamping.

The snowflake design is from Bundle Monster's image plate BM-323. This seems to be one of my favourite plates because it has so many good designs. I did try stamping with a contrast of a dark silver. With the light hitting the holographic goodness on my nails you can not notice the mess that I made on my thumb. I stamped with Nails Inc. Cleopatra's Kiss over the top of my Konad Dark Blue. On my ring finger I stamped first with Cleopatra's Kiss and then with Konad Dark Blue. You can not see it unless you look hard and up very close on my ring finger.

Last of all I took a picture in the shade so you can see the design and some of the mess I made on my thumb with my over-stamping. Excuse the shoddy clean up. I did not intend on keeping this manicure on when I had finished because of the thumb nail and the chipping on my right hand.

Goodbye Winter and hello Spring. Sorry Winter, I am not sad to see you go!
Thursday, 30 August 2012
Awesome Aussie August: Satin Seasonal 01 and 03
This post will be light on words as it is being brought to you by a headache. Yes, I am dedicated to you and want to get this done.
When I saw the lovely purple of Satin Seasonal Nail Enamel 01, I had to add it to my little Satin collection. I am sure I have something like this already but I adore purple. In the same bargain bin dig I found Satin Seasonal Nail Enamel 03. AHA! These would look great together.
Sadly, I did not get a single good picture of Seasonal 01. This polish has a pretty shimmer and I could see red and blue particles in the dry polish. The only places you will see this colour by itself is on my thumb in the above picture and this blurry picture below.

I did manage to get a few pictures of the combination of 01 and 03. Satin Seasonal Nail Enamel 03 is a glorious glitter top coat with holographic hex and bar glitters. I am sure that there is colour changing regular glitter in there along with aqua and purple.

This was much more attractive in person. You have heard me say before that my camera won't capture all of the colour and holographic goodness.

And one last picture to share. This picture was taken in the shade to try to show the glitters better.

When I saw the lovely purple of Satin Seasonal Nail Enamel 01, I had to add it to my little Satin collection. I am sure I have something like this already but I adore purple. In the same bargain bin dig I found Satin Seasonal Nail Enamel 03. AHA! These would look great together.
 |
| Satin Seasonal Nail Enamel 03 |

I did manage to get a few pictures of the combination of 01 and 03. Satin Seasonal Nail Enamel 03 is a glorious glitter top coat with holographic hex and bar glitters. I am sure that there is colour changing regular glitter in there along with aqua and purple.

This was much more attractive in person. You have heard me say before that my camera won't capture all of the colour and holographic goodness.

And one last picture to share. This picture was taken in the shade to try to show the glitters better.

Wednesday, 29 August 2012
Eye Shadow Nail Polish - Settling
Depending on the size and weight of the pigments you put into your base and the base itself, you may discover that your eye shadow nail polish settles. This is nothing to worry about. In fact, this is the reason why you put those ball bearings in to start with. If you didn't you had better put them in now.
The image below shows Smurf Droppings and Splendid Shimmer after a week of sitting around with my other nail polishes. Most of Splendid Shimmer as settled out. It had fallen on an angle and so you can not see the pigment as sediment at the bottom. You can clearly see the pigment in the bottom of Smurf Droppings.

I had found that Splendid Shimmer appeared to stay in suspension longer than Smurf Droppings. Overnight Smurf Droppings will settle out while the appearance of Splendid Shimmer appears to be the same.
Now. Shake!
Everything is back to normal and you can use it again. Hurray!

After I took the first photo, I thought I had better add a label to Smurf Droppings too. Oooops!
Awesome Aussie August: Peita's Polish Aussie Bee
I am a sucker for anything bee related. When I saw Aussie Bee in Peita's etsy store, I had to make an order.

My base colour is Ulta3 Honolulu. Although I have added some thinner, it is still thick and applies awkwardly. I had to use three coats to get a decent appearance. The colour of my manicure owes its colour to Honolulu rather than to the yellow jelly base. Looking at the base I did not believe I would get a good look on my nubbins applying it by itself.
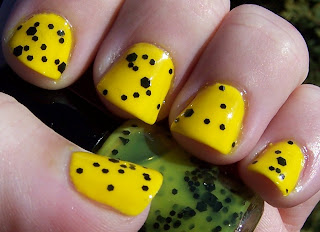
Honolulu is the best opaque yellow that I currently have. If I had a more lemon yellow, that would have fit with Aussie Bee a lot better. Aussie Bee applied well for a glitter and the pictures show one coat. Seche Vite was used as a top coat.
Tuesday, 28 August 2012
Awesome Aussie August: Peita's Polish Little Princess on Satin.
This will be a very short post as I only obtained one good picture.
I used a base of PVA glue. I have been experimenting using this and I am currently working on a post about my experiences using it as a base coat. Then I applied three coats of Satin Nail Enamel 6. In the bottle it seems as though it would be a pink foil. It is a lovely pink colour and Miss L has claimed it.

Over the top of Satin 6, I applied two coats of Little Princess from Peita's Polish. This is a pink holographic glitter top coat. Using two coats gave the polish plenty of sparkle to stare at and as usual my camera refused to pick up all of the action.
All in all, a very girly manicure.
Monday, 27 August 2012
Awesome Aussie August: Satin Nail Enamel 10 Gradient
Here we go with the imaginative names again. I have another Satin nail polish for you and this one is Nail Enamel 10. It is almost a smurf blue with a magenta shimmer. That shimmer is apparent in the bottle but harder to see on the nail and impossible to capture on camera.


I applied three coats of this to make it opaque. The previous two coats were patchy and I could have possibly gone with another coat. I did not bother since I knew I was going to add more polish with a gradient.

Satin Nail Enamel 21 was seen previously as the blue base colour of my Australian Flag manicure. I fell in love with the look of that polish. When the bottles of the two colours were placed together, I knew that they would work. I did not think that the shimmer would interfere. It didn't but, I was not to know that it would barely show on the nail.

My gradients are sponged on with a make up sponge. A large bag was bought at the supermarket but you can find them almost anywhere. The fine effect that the make up sponge gives to the gradient is the style that I prefer. Admittedly, I have never tried a gradient with a larger holed sponge.

Isn't this so pretty? I could have almost used it for a nautical scene. The difference in the colours is more noticeable in reality.
When I first posted about Satin polish I mentioned that they had a website that did not work. In my travels over the internet I found a working site from the brand. Here you can buy and take advantage of their three for the price of two offer. It also looks as though all of their polishes are toluene, formaldehyde, camphor and dibutyl phthalate free. The down side is that there is little information around to give you an idea of what you are buying. You need to guess at the colours you want from the screen and hope for the best. Is it a shimmer, glitter or creme? All I know is that they are $2.50 each and $4.95 for their classic range.
When I first posted about Satin polish I mentioned that they had a website that did not work. In my travels over the internet I found a working site from the brand. Here you can buy and take advantage of their three for the price of two offer. It also looks as though all of their polishes are toluene, formaldehyde, camphor and dibutyl phthalate free. The down side is that there is little information around to give you an idea of what you are buying. You need to guess at the colours you want from the screen and hope for the best. Is it a shimmer, glitter or creme? All I know is that they are $2.50 each and $4.95 for their classic range.
Sunday, 26 August 2012
My experiences with PVA glue as a base for nail polish.
Essence's Peel Off Base Coat has stunned glitter lovers everywhere for a number of reasons. Pretty Purple Polish blogged about getting a bottle of PVA glue to test the effectiveness. Why? This base coat is hard to find and Lab Muffin confirmed that the Peel Off Base Coat was simply PVA glue thinned with water and added preservatives to combat the microbal growth that occurs when you add water products. With this news I promptly added a bottle of Sellys PVA to my supermarket trolley.
Not all products behave in the same way with all people. I thought I would share how PVA behaved when I used it on my nails. I commented on Pretty Purple Polish's post that I used Orly's Tough Cookie because it tended to flake off on sheets on my nails. This made for easy glitter removal. Pretty Purple Polish responded that she had a base coat that did the same but not as easily as this.
The first time I used PVA as a base I did a quick swatch and removed it straight away. It removed easily but I suspect that a regular base coat would also remove easily. This is because the middle layers of polish are still tacky. After soaking my hands in the bath I cleaned my nails for completely polish free fingernails.
Now for a recounting of the second time I used PVA glue. I applied the glue and waited for it to dry. It is easy to tell as the PVA goes from opaque to transparent. My polish was worn for two days before I removed it. I found it very difficult to lift and the best leverage I had was from the sides of my nail. Once I got it lifted it removed fairly easily until it got to my free edge. There the polish stuck - like glue. I ended up having shaggy glitter polish tips and bare nails. I did the washing up and soaking my hands in the hot water for an extended period helped lift the "tips" easily.
The third time I used PVA as a base coat, I used two coats. For my nails this allowed me to peel the majority of the polish off very easily and remove the rest with some rubbing when I soaked in a bath. The down side is that the polish had started lifting at the edges overnight.
So, it seems as though if I want the best results for my nails I need to use one coat of PVA glue and have a soak in the bath or do the washing up to remove the polish easily. For extra easy removal and short term wear, I can apply two coats of PVA at the start. This is slightly less work than the foil method but it has four advantages:
I am not sure that I am quite comfortable changing completely over to using glue as a nail polish base just yet.

Not all products behave in the same way with all people. I thought I would share how PVA behaved when I used it on my nails. I commented on Pretty Purple Polish's post that I used Orly's Tough Cookie because it tended to flake off on sheets on my nails. This made for easy glitter removal. Pretty Purple Polish responded that she had a base coat that did the same but not as easily as this.
 |
| Still wet PVA glue on the nails. |
Now for a recounting of the second time I used PVA glue. I applied the glue and waited for it to dry. It is easy to tell as the PVA goes from opaque to transparent. My polish was worn for two days before I removed it. I found it very difficult to lift and the best leverage I had was from the sides of my nail. Once I got it lifted it removed fairly easily until it got to my free edge. There the polish stuck - like glue. I ended up having shaggy glitter polish tips and bare nails. I did the washing up and soaking my hands in the hot water for an extended period helped lift the "tips" easily.
 |
| Getting there, my nails are almost dry but you can see some wet patches. |
So, it seems as though if I want the best results for my nails I need to use one coat of PVA glue and have a soak in the bath or do the washing up to remove the polish easily. For extra easy removal and short term wear, I can apply two coats of PVA at the start. This is slightly less work than the foil method but it has four advantages:
- PVA is not toxic.
- Removal does not stink of chemicals.
- Removal is less messy. No more foil, finger cots or wipes needed. Glitter is still attached to the polish.
- Cheaper. I bought my bottle for less than $6 for a 250 ml size. Therefore it is cheaper than base coat and you do not need to buy nail polish remover.
I am not sure that I am quite comfortable changing completely over to using glue as a nail polish base just yet.

Awesome Aussie August: Acknowledgement of Country
At the start of every school parade at Mr R and Miss L's school, they have an Acknowledgement of Country. It is used before meetings and other gatherings to recognise the Indigenous people as custodians of our land. When members of the Indigenous community are able to start the event, they will "Welcome (the attendees) to Country".
I want to share with you my small tribute to these people who have lived on this land for thousands of years and hold it close in their hearts and spirits.

This manicure did not turn out how I wanted it to. I wanted to use Australian nail polishes in black, red and yellow but none of the red and black Australian (made or owned) polishes would co-operate even with the addition of thinner. A re-think was required. Here is what I decided to continue fitting in with the colours of the Australian Aboriginal Flag.
Black: Colour Club Revvvolution. Black symbolises the Indigenous people of Australia. For me, the sparkles of the holographic will bring the Dreamtime with the Rainbow Serpent into my manicure.
Red: Rimmel Hot Rock. This polish is perfectly named to represent the red earth. It is a red jelly with gold glass flecks.
Yellow: BYS The Right Bright and Ulta3 Honolulu. These two yellows are to embody the sun. The Right Bright is a jellyish polish touted as a "Neon" on the bottle and Honolulu is a standard yellow creme.
Now onto the details of the manicure. Let us start with my thumb. The Australian Aboriginal Flag is represented on my thumb. In Australia this design is copyrighted by Harold Thomas who designed the flag in 1971.
Over a base coat I applied two coats of Hot Rock and then a coat to Seche Vite. When it was dry I taped off half of my thumb to apply a generous coat of Revvvolution. After ripping off the tape I applied yet another coat of Seche Vite. I applied Honolulu with a dotting tool and tried to make it large enough to look right. Honolulu was used as it was the more opaque of the yellow polishes.

My sun is not very round and I should have applied another coat of Hot Rock. Still, I think you can recognise what the design is supposed to be if you are familiar with the flag.
Now for my regular fingers. All of them except my ring finger have a base colour of Color Club Worth the Risque. This was so that the holographic could add sparkle and interest through the watermarbling. I had originally intended to watermarble all of my fingers and have the flag on my thumb. Something was not right and the polish would not co-operate. I am still a watermarbling novice. The polish would not spread and so I changed the Australian red and black I was using because they were too thick. I had to use BYS The Right Bright for my watermarbling and even then I added some thinner to it. For some reason the polishes had trouble spreading. Sometimes they would and at others they would not.
On my index finger I did some kind of toothpick drag. Over the base colour I added a stripe of Revvvolution, The Right Bright and Hot Rock and then scraped across my nail with a toothpick left over from my watermarbling attempts.

My middle and little fingers were treated to watermarbling. It was frustrating and very messy but the outcomes are nice even if not as bold as I was hoping for. My favourite part of the design is on the middle finger where there is a concentrated band of yellow, red and black.

Last of all, my favourite design of all of my fingers. The design is easy and you probably do not need me to describe what I have done. Over a base colour of Revvvolution I have dotted Worth the Risque, Hot Rock and Honolulu. I used a dotting tool to create this design meant to evoke dot painting, one of the most famous styles of contemporary Aboriginal Art.
It may not have finished as I had planned but I do think it is an attractive manicure as a tribute.
Saturday, 25 August 2012
Awesome Aussie August: Peita's Polish - Shooting Stars
I previously used Shooting Stars over Satin Nail Enamel 21 but the blue stars were lost on the base. After removing the polish because it had started chipping before I had opportunity to take some pictures, I tried again. This time I used the latest craze of PVA glue for my base coat. After this had dried to clear I used Ulta3 Antique Copper.

Antique Copper seems more a champagne gold colour in many lights to me. I used two coats of this colour to make it opaque.

Over the top I used Peita's Polish Shooting Stars. After my experience with Zebration, I should have added some thinner to it. In fact, I should have done it after my first use of Shooting Stars over the blue polish. It is very thick and I had trouble fishing the stars out.

Shooting Stars has a lovely blue shimmer that showed up spectacularly on the blue colour but I could not seem to find it on the gold base of this manicure.

What I could find but not photograph well was the holographic glitter. This is definitely the shooting star part of the polish for me. I am a sucker for anything holographic although I have stayed away from the gritty holographic glitters because of the removal factor.

With the PVA glue as a base it did come off easily. I removed the polish fairly soon after I did the manicure and took photographs. Because of this it seemed as though the middle layers of polish were still tacky and that was the hardest part to remove. I had a bath and this resulted in clean nails.
Friday, 24 August 2012
News Flash! Max Factor Fantasy Fire in Australia.
I nearly died and turned into a little puddle in the middle of Priceline. Every time I go past a Max Factor display, I always check the Max Factor display for Fantasy Fire. Each time I am disappointed until today.

OMG! OMG! OMG! was heard. It is a good thing I was not alone because there could have been a worry that I was having a heart attack. You need a lot of support when you discover such a find as this! I had to buy all three that they had on display. Three bottles only equals one regular bottle and I promise I am going to share one bottle of my Fantasy Haul. This is my reward for not spending the money and getting it through eBay.

Having this will enable me to compare my Darling Diva Ringer to Fantasy Fire. It is a good thing that it is not long until September is here and Awesome Aussie August is over!
Finding Fantasy Fire made my day. Hurray! OMG! I can't believe I actually have Fantasy Fire.
Ahem. I'll settle down now.
Awesome Aussie August: Gloss n Sparkle
I have a special feature for you today with the polishes from Gloss n Sparkle. You can buy these on etsy from Angela's shop.
The three colours I bought were Goblins Grave, Mirage and Sangria. I could not resist these sparkling beauties and I had my eye on Gloss n Sparkle polishes ever since I started trolling through listings on etsy about a month ago.
When I next wear any of these I will wear a similar colour under the nail polish. I used Sangria and Goblins Grave on their own and Mirage over the top of another colour.

First up we have Goblins Grave. When I opened my parcel I had the biggest oohs and ahhs over this one. A glorious dark green jelly with holographic glitter. I did not get good pictures with either Goblins Grave or Sangria as we had a couple of miserable days. One day I may invest in making a light box.

I applied three coats to achieve this depth of colour and look. Seche Vite was used as my top coat but I damaged the jelly on my thumb. Hence there are no thumb shots for this polish. There are no complaints about the application and the outcome is so very pretty. It does make me long for longer nails to set off this look.

This pretty baby blue polish is Mirage with pink and aqua (although the listing says gold) shimmer, silver glitter and large holographic glitter.

Essence Absolutely Blue was used as the base colour for this polish although it is darker. I think this helped vastly with the wear on the polish as I wore it for almost three days. That is one of my longest lasting wears.

I was really happy with the stamped snowflake manicure I made out of this but I did not capture any pictures because my camera ran flat.
Lovely, lovely Sangria is the first that I used. Last on this list. I know Angela describes it as a red jelly but I would call it very dark pink. See the mix of the glitters? It made my camera freak out. I adore this polish and it was what goaded me into making the order. Sighting Goblins Grave only sealed the deal

I was so keen to get Sangria on my nails that I applied it at night in practical darkness. The picture below shows why that was a bad idea. The application of a base colour will probably help this polish because I had to apply four coats of polish.

Yes, I did find this polish after admiring Lacquer or Leave Her's Tequila Sunrise manicure. As I do not have the length of her nails, this is probably the closest I will get to the lusciousness of that manicure.
Overall, these are great polishes but I think for best wear you need to put a coloured base underneath. My order was also shipped promptly and I received it quickly although it required to travel via road transport due to Australia Post restrictions.
Thursday, 23 August 2012
Awesome Aussie August: Peita's Polish - Zebration
A Zebration is a hybrid between a zebra and dalmation. You have the black and white stripes in the form of bar glitter to make up the zebra component. Would Cruella de Vil love these small and large hex glitters in white and black?

Rather than layering the glitter on, I had to dab it on. My base was very thick and the glitters did not come off easily. I am sure some thinner would help with this as I have read another review where the glitter flowed on easily. My bottle is the small 5 ml version and that may have made a difference with the brush.

My base colour is BYS Kung Fu Blue and it is NOT colour accurate in these pictures. I prefer the colour in these pictures to the more yellow toned version of Tiffany blue it actually is. Is this proof I need a new camera? It is nine years old and I should cut it some slack.

Rather than layering the glitter on, I had to dab it on. My base was very thick and the glitters did not come off easily. I am sure some thinner would help with this as I have read another review where the glitter flowed on easily. My bottle is the small 5 ml version and that may have made a difference with the brush.

Wednesday, 22 August 2012
Awesome Aussie August: Ulta3 Magnetic Seduction
Miss L and I were looking at the Ulta3 polishes. It's hard not to look when you are a polish addict as there is so much available for a bargain price. From the new magnetic polish display, Miss L chose Seduction for me.
Ulta3 provides magnets with their polish in a cardboard holder attached to the handle of the polish. Be careful with magnets around your electrical devices. I had one of those slice styles accidently placed near the netbook. I no longer have a display on the netbook that functions properly as it is all wiped away with the power of magnetism.

Seduction is an unusual shade. It is purplish in some lights but can seem more burgundy in others. I used the magnet on all of my fingers except for the ring finger. Unlike the design on the package (Which I won't photograph because it is damaged.) the nail polish shows with a frosty, almost metallic appearance when the magnet has not been used.
I found the process tedious and not very rewarding. When you use the magnet over the polish you get a sharp, frosty line. As the polish dries that line spreads to a much wider band. It is also difficult to hold the magnet without hitting your nail. The magnet is simply attached for a piece of cardboard folded into a triangular shape.
Do not apply your top coat too early. Allow the polish to dry for some time first. This is how I ruined the magnetic holder. How? I started applying top coat to still wet polish and found that my magnetic lines were smearing out and I was getting polish all over my brush. I ended up scraping the offending polish onto the cover.
For me, magnetic polish is a novelty. It is an interesting novelty but not something I would use very often.
Tuesday, 21 August 2012
Awesome Aussie August: Peita's Polish "Haul" featuring Wonky Nerds
Earlier in August a few Australian Bloggers were doing a seven day Great Aussie Polish Challenge. I came across Peita's Polish at Polished Peripherals. The colours did not interest me but I looked at the etsy store. Uhoh. I was in trouble! Aussie Bee!
Peita gave me fantastic customer service when I made my list of mini nail polishes. She even refunded me the birthday discount I did not put in because I was too eager to pay her. They were packed and shipped quickly even though it was a special request. I received it within a week of ordering. You can't complain with that can you?
I did add some labels to the handles so I would know which was which in the future. That would be my only complaint. I am not certain if the full size bottles have their names. You can look at these as more sample sizes. We have Wonky Nerds, Little Princess, Shooting Stars, Zebration and Aussie Bee.

Wonky Nerds is a purple and holographic pink glitter top coat. Unusually, I did not use top coat. See the bumpy texture?

I used Chi Chi Cradle Snatcher as a base colour and applied one coat of Wonky Nerds. Can you see the little flecks of holographic? They did not have regular packs of Nerds at the supermarket so I made do with a share pack.

Ok, maybe I had two packs...

Monday, 20 August 2012
My "Stance" on Illamasqua's Fight for Fair Beauty Price Campaign
This topic has been posted about on a number of blogs. I first came across it on Agnieszka's blog - Beauty Cat Castle.
Illamasqua wants consumers to "sign" their petition. When they achieve 20,000 petitioners they will reduce their prices in line with what women in the UK pay for their products. In return you pledge that you will buy Illamasqua's products when they do reduce them. It has been put forth that this is a challenge to other beauty retailers in Australia to also reduce their prices.
This is what I had to say earlier about the campaign:
Remember the outcry from Australian retailers about people buying online and from overseas rather than in Australia?
This is the reason why. Unless you have bottomless pits of money, why would you buy a product in Australia rather than getting it significantly cheaper from overseas if you can?
Sure, if I spend my money here I can help support someone else in Australia but I would rather save the money for something I want to buy and use it to support my own family.
I don't understand why we need to demonstrate and sign petitions to make Illamasqua to "slash" their prices. Surely they have some control over what the Recommended Retail Price is. Surely doing the campaign and lowering prices at the same time would work the best. I hope that they do reduce their prices as Illamasqua is lovely.

There has been some reported criticism of the campaign from the Choice consumer group. They claim that it is a clever marketing campaign and a data gathering exercise. One reason why I have not "signed" the petition is because I am not comfortable with sharing my personal information.
I do think it is clever marketing but obviously I would like to get my hands on affordable Illamasqua to join my lonely Stance. In my opinion, I feel that they should have dropped their prices in conjunction with the exposure of the campaign. This would have highlighted the brand and the new price. People would not be buying at the current levels but more. Illamasqua cite current low volumes of sales as the reason why they have not reduced prices.
There is one thing about Illamasqua I like over the other brands. My bottle of Illamasqua was bought in Australia and it was MADE in Australia. Wouldn't it be great to spend the same amount as people in other countries to get the same product and to keep some of the money in country? Yes, I like the idea that Illamasqua is investing the interest and part of their workforce in my country. So many of the Australian brands I have featured during Awesome Aussie August have moved their production offshore.

Currently they sell Illamasqua for $34 in Myer. To buy the same item from the Illamasqua website in the UK costs approximately $20.35. In Sephora for United States customers, the same product is US $14. Considering that the Australian dollar is currently around parity with the US dollar, we are paying $20 more a bottle. Compare the three screen shots below for the same nail polish.
I know that I would be more likely to buy an Illamasqua nail polish if it were $14 a bottle. I would have a hard time paying $20 a bottle. I have only paid this once for a bottle of OPI Not Like the Movies because I wanted to be sure of which duochrome version I was receiving. Yes, I buy my OPI, China Glaze and Orly from overseas as it costs me much less than their price in Australia and that is including the shipping. That is if you can obtain the same product in Australia. For the $50 note in my pictures I could buy one bottle of Illamasqua in Australia, two bottles in the United Kingdom and three bottles in the United States. It hardly seems fair to live at the bottom end of the world.
Another thing about nail polish in Australia is that a lot of the time you can not buy products such as OPI or China Glaze unless you have a nail technician qualification or can verify you are a beauty student. There does not appear to be any type of restriction like this in the United States. Australian websites quote in their terms and conditions that this is to ensure that qualified people use the products and that they are not misused. Pardon? For the nail polish?
What is the best way to correct this balance? One way is to vote with your money. If you will not pay the outrageous prices then there is not a market for the high priced items. It seems with the retailer outcry over losses of profit due to online retailers and overseas online purchases that maybe some might slowly be getting the idea. We can easily shop around for the best price now and it does not need to be local.
Illamasqua wants consumers to "sign" their petition. When they achieve 20,000 petitioners they will reduce their prices in line with what women in the UK pay for their products. In return you pledge that you will buy Illamasqua's products when they do reduce them. It has been put forth that this is a challenge to other beauty retailers in Australia to also reduce their prices.
 |
| Illamasqua Stance stamped with China Glaze 2030. Image from BM-309 |
This is what I had to say earlier about the campaign:
Remember the outcry from Australian retailers about people buying online and from overseas rather than in Australia?
This is the reason why. Unless you have bottomless pits of money, why would you buy a product in Australia rather than getting it significantly cheaper from overseas if you can?
Sure, if I spend my money here I can help support someone else in Australia but I would rather save the money for something I want to buy and use it to support my own family.
I don't understand why we need to demonstrate and sign petitions to make Illamasqua to "slash" their prices. Surely they have some control over what the Recommended Retail Price is. Surely doing the campaign and lowering prices at the same time would work the best. I hope that they do reduce their prices as Illamasqua is lovely.

There has been some reported criticism of the campaign from the Choice consumer group. They claim that it is a clever marketing campaign and a data gathering exercise. One reason why I have not "signed" the petition is because I am not comfortable with sharing my personal information.
I do think it is clever marketing but obviously I would like to get my hands on affordable Illamasqua to join my lonely Stance. In my opinion, I feel that they should have dropped their prices in conjunction with the exposure of the campaign. This would have highlighted the brand and the new price. People would not be buying at the current levels but more. Illamasqua cite current low volumes of sales as the reason why they have not reduced prices.
There is one thing about Illamasqua I like over the other brands. My bottle of Illamasqua was bought in Australia and it was MADE in Australia. Wouldn't it be great to spend the same amount as people in other countries to get the same product and to keep some of the money in country? Yes, I like the idea that Illamasqua is investing the interest and part of their workforce in my country. So many of the Australian brands I have featured during Awesome Aussie August have moved their production offshore.

Currently they sell Illamasqua for $34 in Myer. To buy the same item from the Illamasqua website in the UK costs approximately $20.35. In Sephora for United States customers, the same product is US $14. Considering that the Australian dollar is currently around parity with the US dollar, we are paying $20 more a bottle. Compare the three screen shots below for the same nail polish.
 |
| Stance screenshot - Myer Online |
 |
| Stance screenshot - Illamasqua UK |
 |
| Stance screenshot - Sephora |
Another thing about nail polish in Australia is that a lot of the time you can not buy products such as OPI or China Glaze unless you have a nail technician qualification or can verify you are a beauty student. There does not appear to be any type of restriction like this in the United States. Australian websites quote in their terms and conditions that this is to ensure that qualified people use the products and that they are not misused. Pardon? For the nail polish?
 |
| Stance with reflective plastic (yes it is real) money. |
What is the best way to correct this balance? One way is to vote with your money. If you will not pay the outrageous prices then there is not a market for the high priced items. It seems with the retailer outcry over losses of profit due to online retailers and overseas online purchases that maybe some might slowly be getting the idea. We can easily shop around for the best price now and it does not need to be local.
Subscribe to:
Posts (Atom)