Showing posts with label Mode. Show all posts

Monday, 15 October 2012

Polish Us Pink! Dots and Ruffles

I thought long and hard about what I could do for this manicure. I did not want to stamp and I wanted to do something that I had not done before. Honestly, it was a bonus to be simple.

Today I present three pinks to you. Mode Cerise is a pink that builds up to a cherry red. When you marble with this colour it is definitely pink. The neon shade is Hollywood from the B Collection by Bloom. I have never used a Bloom polish before but this was one out of a set of three I bought. I will have to try one out as a base to see what it is like. Last of all I thought I would use the Cleo magazine freebie, Nails Inc Bag a Bachelor. I loathe the formula on Bag a Bachelor but since I was dotting, it was not going to matter.


I started out with Cerise and gave my nails two coats except on my ring finger as that was going to be the accent nail. Then with a dotting tool I simply added large dots of Hollywood and then small dots of Bag a Bachelor.


For the accent finger I decided I would try a ruffle. I had tried once before with this style and I failed. Honestly, how could someone fail at putting dots in lines across their fingernail? Me. This time it worked out much better. I did not bother with a base colour and simply dotted my three pinks in rows. Voila! Done!


The McGrath Foundation has a very specific goal for their fundraising. They use the funds to place Breast Care Nurses in communities throughout Australia. The other focus in on raising awareness in young women.

Sunday, 16 September 2012

Daily Manicure Week - Sunday Dots

Finally, Sunday.

Sunday is a day to sleep in and recover from Saturday. If you feel up to it you might have a while to spend on your nails. Then again you might not feel all that great so something simple is called for. What could be more simple than a dot manicure? By now you are probably feeling dotty for doing your nails so much. Especially if you have been using the same two colours.


The only reason why I used Red Velvet as the base colour for this manicure is because of Wednesday's post. I thought it would look too similar as the stamping plate image used was of dots.

I simply started with a large dot at the corner of my nail and then did a row of small dots. Large and small dots were alternated until the nail was filled. After the polish had dried a bit, I placed a small dot in the middle of the large dots. Dot manicures are very simple and effective. People always marvel at them and do not seem to realise how quick and easy they are.


Saturday, 15 September 2012

Daily Manicure Week - Saturday Spun Sugar

Hurray! It is finally the weekend!

Today you want to wear something special and different on your nails. You prepare yet another base of Don't Feed the Hand Models and then plop some Red Velvet on a plate and wait. And wait. Then wait some more until you can draw strands of polish much like the spun sugar of fairy/candy floss. Drape these strands across your nails. Done.


This manicure does take longer to dry. The thinner you can get the strands the better because you get less dry time. To be able to form the strands the polish needs to be on the way to drying. I used the tutorial by Nails from a Fairy Tale to create this manicure.


This is ok for my first effort but I would like to try it again with a different polish to see if I can get finer strands out of the polish.

Friday, 14 September 2012

Daily Manicure Week - Friday Freehand

Thank Goodness It's Friday!

You have upgraded your current manicure twice. If you add something else to it, that might be overkill. And you can't seem to find anything else but Sephora by OPI Don't Feed the Hand Models and Mode Red Velvet.

Paint whatever you want. I thought it was simplest to paint on a smile. My artistic skills are pretty dismal. Look at my lettering there...


I tried again and ended up with another mess. There were some hearts and then I did these tulip like designs. Maybe freehand was not such a good idea. I guess these could have looked ok if I had done them on all of my fingers.


It's ok. It is nearly the weekend!

Thursday, 13 September 2012

Daily Manicure Week - Thursday Tape

Good Morning Thursday. Just one more day after this until the weekend!

You liked the stamping manicure from yesterday and you don't really want to start over again with another manicure. Yes, another upgrade sounds like a brilliant idea. Out comes the tape and with some careful scissor cutting and removing some of the tackiness of the sticky tape, a new manicure is born.


Of course you can also do this manicure without having the stamping underneath. My tape skills are no where near the league of Erica from Chloe's Nails.


Below is a step by step pictorial of how I cut the tape for the manicure. For this demonstration I used masking tape as it is opaque and easier to photograph.


Wednesday, 12 September 2012

Daily Manicure Week - Wednesday Stamping

Oh here it is, Hump Day.

Now that you have removed the horrible manicure that looked like you went on a murder spree...

Out comes Don't Feed the Hand Models and Red Velvet because they are the only two polishes you can find. URGH! Hump Day. You apply Don't Feed the Hand Models as a base colour and then quickly stamp over it with Red Velvet.


I used an image from Bundle Monster's BM-322. Now this looks a lot better than the blood caked manicure from Tuesday. Red Velvet may not be the best polish for stamping with but it still looks pretty good. There is not a top coat in these pictures and this enhances the appearance.


Tuesday, 11 September 2012

Daily Manicure Week - Tuesday Cling Wrap

Hello Tuesday.

You started off with a plain manicure because you did not have much time to work on a manicure on Monday. It was that hard weekend you had. Now it is Tuesday and we get to introduce the second colour that we can use in our manicures. The polish I chose is the gloriously almost rusty coloured Mode Red Velvet. I had promised a featured spot on Red Velvet and I still have not done it yet. This colour was not the best choice as you will soon see why.

So what do you do when you have to get to work and you already have a plain base (Sephora by OPI Don't Feed the Hand Models) to work with? You can upgrade that manicure. After making those lunches and wrapping everything in cling wrap, take a little piece and bundle it up. Put a coat of polish onto your nails and dab it off with the cling wrap. I chose this way rather than using the cling wrap to apply the polish like a sponge because I had always liked the manicures from other bloggers using this method.


I think Red Velvet is the wrong colour to do this with as it looks as though I have dried blood splodged all over my nails! Then I tried to rescue the manicure. The below picture is outside of the rules I am trying to set for myself in Daily Manicure Week. I had to try to make it look better. It looks worse with China Glaze 2030 cling wrap sponged over the top. In real life my clean up does not look so bad but on macro... Blech. :(


I hope Hump Day Wednesday turns out better. This manicure would work better depending on the colours you choose. Use this as a lesson in not to use together.

Thursday, 16 August 2012

Awesome Aussie August: Seven Little Australians

I was not a part of the Great Australian Polish Challenge but I posted some Australian polishes so far this month. So with hindsight I am now declaring it Awesome Aussie August.

First was Chi Chi with two manicures from this brand. Cradle Snatcher Gimme Gimme a Man.

Chi Chi Cradle Snatcher with accents in Daring Digits First Love.

Chi Chi Gimme Gimme a Man with accents of Daring Digits True Love.

Second was Satin Nail Enamel 21 to create our flag.

Satin Nail Enamel 21 with Konad A1 ICNA plate images in Konad White and Dark Red.

Third was Colour by T.B.N in Passion and Adore.

Colour by T.B.N. Passion with accents of Adore.

Natio Brandy was the fourth.

Natio Brandy
I "Messed Up" with Mode for the fifth.

Mode Messed Up


Next to last was BYS.

BYS Kung Fu Blue
The Seventh Little Australian is Ulta3.


Tuesday, 14 August 2012

Awesome Aussie August: Happy Birthday August

This is my first watermarble and I thought it would be the best way to create sardonyx for August. Most people would associate peridot as August's birthstone but sardonyx is an alternative birthstone. Sardonyx is a layered stone in shades of red and white.

Sardonyx image by Adrian Pingstone. Public Domain image via Wikipedia Commons
Today also marks the first month since I started this blog. Happy one month anniversary Stubby Nubbins!

I decided to use some Mode polishes as they are cheap and I have seen them used for watermarbling previously. Red Velvet is a glorious metallic red that has an almost rust shimmer. In the future this will be shown again to share some of it's goodness.


Watermarbling is messy! I am not sure that I would easily do this on both hands without ruining the manicure. Lots of sticky tape, cotton buds, wipes, paper towel and acetone was used.

I think I needed to let the nail polish dry more before I applied the top coat. In all of the tutorials I have read, they mention that you need to work quickly. It is possibly due to the weather that the polish stayed wet over the water for a long time. This made it extraordinarily difficult to clean around my finger before I pulled it out of the water.


What you don't see here is my test run over my old manicure. This used Mode Red Velvet, Cerise and So Parisian. It did not work so well so I started with Cerise and N.Y.C. Color Casper.So Parisian was too sheer to use. I used the same two colours for the index finger. I did not feel this look was right as Cerise became too pink in the marbling. A better result was achieved when I used Red Velvet and Casper on my thumb, middle and little fingers. My little finger was my favourite but I ruined it with my top coat. The other finger that turned out well was the thumb.

Sunday, 12 August 2012

Awesome Aussie August: Mode Messed Up

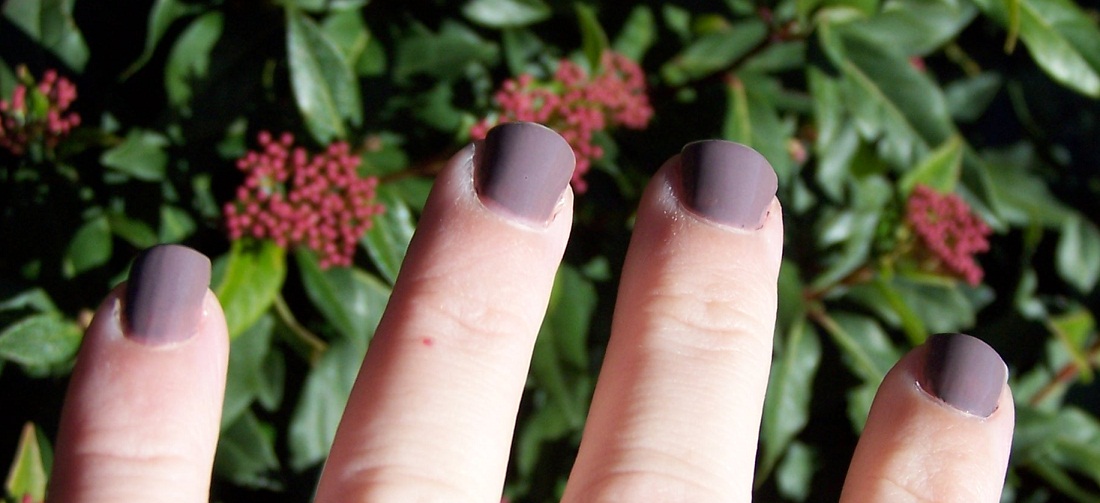
I don't know why I overlook the Mode stand at my local chemist. There never seems to be anything that grabs my attention. Is it because I have too much polish already? How could I entertain such an idea? Mode is exceptionally affordable at $2.45 for 15 ml of polish.

Some Mode polishes are made in Australia. Most of the others are made in China. I even found one that was made in the UAE. Today I have Messed Up and my bottle was made in China. In the bottle it appears a grey/purple colour. This is something unique in my hoard of polish. It applied well and the brush was easy to work with. So why don't I have more Mode polishes?


What I am trying to hide in this picture is the tip wear on my nails. There are also many small chips on my thumb. I applied this polish before I went to bed and I took these pictures the next morning. I can not work out how this polish could have chipped from me sleeping. It must have been a rough night!

I did not have time to remove this polish and put a new one on before I had to dash to work. By the afternoon it was worse for wear. In fact, there were many odd cracks across the polish on my nail. They went in strange directions and shapes. I am presuming that the formula in this polish when dry does not match the flexibility of my nails. The different tensions cause cracking and problems.